How to Clean and Restore a Vintage Fountain Pen Safely

This guide walks through the complete process of safely cleaning and restoring a vintage fountain pen — from the first inspection and careful disassembly to nib tuning and final reassembly. Whether you've just acquired a Parker Vacumatic at an estate sale or inherited a grandmother's Sheaffer Balance, knowing how to revive these instruments properly protects both their monetary value and their writing performance. Skip the fundamentals, and a promising collectible becomes a parts pen faster than you'd think.
What tools are needed to clean and restore a vintage fountain pen?
You'll need a modest kit of specialized supplies — nothing exotic, but each item serves a precise mechanical purpose. A former draftsperson's approach applies here: measure twice, cut once. The right tools prevent scratches, cracks, and irreversible damage to delicate celluloid, hard rubber, or early acrylic barrels.
| Tool Category | Basic Restoration | Advanced Restoration |
|---|---|---|
| Flushing | Bulb syringe, Goulet Pen Flush, distilled water | Magnasonic MGUC500 ultrasonic cleaner |
| Disassembly | Soft rubber jar grip, warm water soak | Padded section pliers, heat gun, shellac flakes |
| Nib Work | 10x loupe, micromesh pads (8,000–12,000 grit) | Brass shims, nib block, smoothing stones |
| Sac Replacement | Silicone grease, talc | Assorted latex sacs, PVC sacs, O-rings |
Here's the thing: you don't need an ultrasonic cleaner for every pen. A simple bulb syringe — the kind sold in pharmacies for infant care — delivers more controlled pressure than running water from a tap. Pair it with a commercial pen flush like Goulet Pens' own house blend or Monteverde Pen Flush, and you'll break down most dried ink deposits without risking fragile finishes. For nib work, a jeweler's loupe (10x magnification minimum) isn't optional. You can't align what you can't see. Micro-mesh pads in progressive grits — 8,000, 10,000, and 12,000 — let you polish tipping material without removing too much metal. Avoid sandpaper. It's too aggressive and leaves scratches that no amount of buffing will hide.
How do you safely disassemble a vintage fountain pen for restoration?
Start by identifying the filling system, then work backward from the cap — and never force a frozen component. Vintage pens aren't glued together with modern thread-locking compounds; they're usually shellacked, press-fit, or threaded with fine pitches that strip easily.
The most common systems you'll encounter are lever fillers (Esterbrook J, Parker Duofold), button fillers (early Sheaffer), touchdown fillers (Sheaffer Snorkel, Touchdown), and piston fillers (Pelikan 140, Montblanc 146). Each comes apart differently. A lever filler typically has a friction-fit section that unscrews from the barrel with gentle heat — a hair dryer set on low works better than a heat gun because it's slower and more forgiving. (Celluloid scorches at surprisingly low temperatures.)
If the section won't budge after five minutes of warm water soaking, stop. Penetrating oils like Kroil can help, but most home restorers don't keep them on hand. The catch? Padded section pliers look like a good idea, but they're a last resort. One slip and you've cracked the lip of a Parker 51 barrel — a mistake that turns a $150 pen into a donor. Worth noting: some pens, like the Sheaffer Snorkel, have complex internal mechanisms with tiny springs and seals. Photograph every stage of disassembly. Your memory isn't as reliable as a series of smartphone snapshots.
What's the best way to remove dried ink from a vintage fountain pen?
An overnight soak in plain distilled water followed by a pen flush cycle usually dissolves even decades-old residue. Tap water contains minerals and chlorine that can stain hard rubber and leave deposits inside feeds, so distilled water is the safer choice for anything pre-1960.
Fill a small glass jar with enough distilled water to submerge the section and nib assembly. Let it sit for twelve to twenty-four hours. You'll often see ink leaching out in clouds — that's a good sign. After the soak, use a bulb syringe to force clean water through the feed channel. Alternate between water and a diluted pen flush solution (one part flush to three parts water) until the liquid runs clear. For pens with removable nibs and feeds — like most Esterbrooks or modern-ish Pelikans — separate the components and scrub the feed gently with a soft toothbrush. The fins on a feed are fragile. Snap one off, and the pen won't write consistently no matter how perfect the nib is.
That said, not all vintage materials tolerate water equally. Hard rubber barrels (common on 1920s Watermans) can oxidize and develop a brown patina — sometimes called "browning out" — if soaked too long. Limit hard rubber soaks to an hour, and dry the parts immediately with a lint-free cloth. For celluloid or early plastic pens, longer soaks are generally fine, though you should never immerse the entire barrel of a Parker Vacumatic in an ultrasonic bath. The vacuum piston mechanism contains thin metal parts that can corrode, and the celluloid itself can develop internal stress cracks from rapid temperature changes.
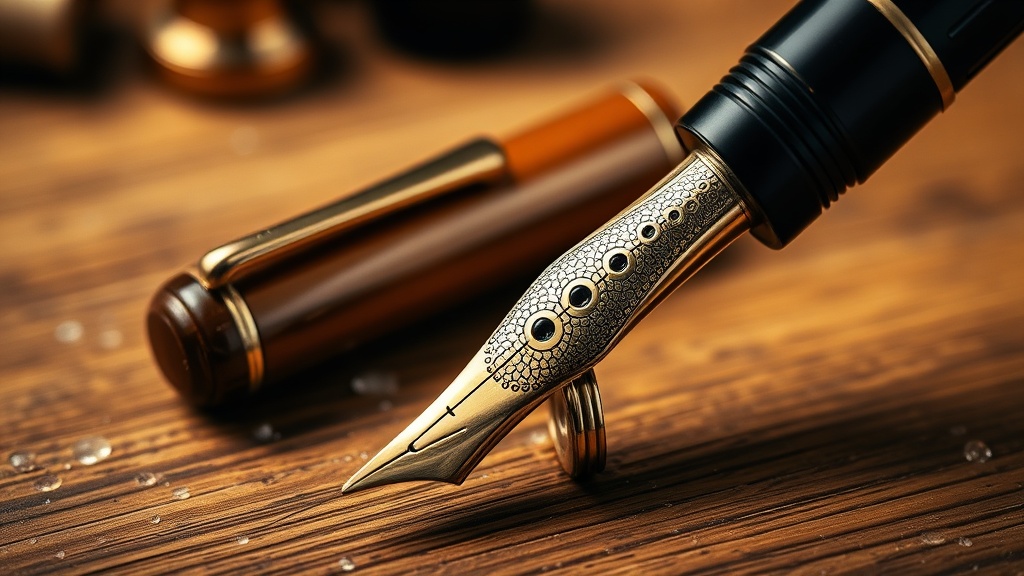
How do you restore a vintage fountain pen nib to write smoothly?
Smoothing a nib requires magnification, patience, and a graduated micromesh progression — never aggressive abrasives or guessing. Most vintage pens write poorly not because the tipping material is worn away, but because the tines are misaligned or there's a tiny burr on the writing surface.
First, inspect the nib under a 10x loupe. Look straight down at the tipping material. The two tines should meet perfectly at the centerline. If one tine sits higher than the other, the pen will feel scratchy in one direction. Adjust tine alignment with your thumbnail or a pair of brass shims — not steel, which can scratch the nib. Apply gentle pressure. Nib steel has memory, but it also has a breaking point. Once the tines are aligned, test the pen on good paper. JetPens stocks Rhodia and Tomoe River pads that reveal subtle feedback without fibrous drag.
If the pen still feels gritty, it's time for micromesh. Work on a flat, stable surface. Lay the micromesh pad down, hold the pen at its normal writing angle (usually 45 to 55 degrees), and make slow figure-eight strokes. Start with 8,000 grit and move up to 12,000. Check progress every ten strokes under the loupe. The goal isn't to reshape the tipping material — it's to remove microscopic imperfections. Stop as soon as the nib glides. Over-smoothing creates a nib that's wet, blobby, and prone to railroading on fast strokes.
Which vintage fountain pen brands are best for beginner restorers?
Post-war Parker, Sheaffer, and Esterbrook pens offer the most forgiving designs for newcomers. They're common enough that mistakes aren't catastrophic, well-documented on forums like Fountain Pen Network, and built with straightforward mechanisms that don't require specialized jigs.
The Esterbrook J series is arguably the ideal first project. The nib unscrews with a simple collar, the lever filler mechanism is exposed and easy to understand, and replacement sacs are inexpensive. Here's the thing: because the nib units are interchangeable, you can test different grades without buying multiple pens. A 2668 (medium firm) or 2556 (fine firm) gives reliable results.
The Parker "51" is another solid choice — with caveats. The aerometric versions (1948–1972) are nearly indestructible. The sac is transparent PVC, the filler is a simple squeeze bar, and the hooded nib design resists drying out. The Vacumatic "51" is a different story. The diaphragm is tricky to replace, and the breather tube is easy to crack during reassembly. Save Vacumatics for after you've mastered at least five or six simpler pens.
Sheaffer's Touchdown and Snorkel lines sit in the middle. The Touchdown is easier — one O-ring and a sac, mostly. The Snorkel adds a complex retractable mechanism that demands careful alignment. Pelikan piston fillers from the 1950s and 1960s (models 120, 140, 400) are mechanically elegant but use cork seals that require precise cutting and shellac application. They're a rewarding second or third project, not a first.
Montblanc pens — especially the 149 or vintage 234 1/2 — should wait until you've built real confidence. The feeds are hand-cut ebonite, the nibs are often irreplaceable, and the piston mechanisms use bespoke parts. A mistake on a $400 pen stings. Start with an Esterbrook. Learn the rhythm of warm water, gentle pressure, and patient observation. The skills transfer. Every pen after that gets a little easier — and the writing experience, when that first restored nib touches paper again, is worth the effort.
Steps
- 1
Disassemble and Inspect the Pen
- 2
Flush the Nib and Feed with Clean Water
- 3
Dry, Reassemble, and Test Ink Flow